How to build a DIY fire pit
Enjoyed with a glass of wine or a cuppa and toasted marshmallows, a fire pit is a beautiful addition to your outdoor area that will be enjoyed all winter long.
Building your own fire pit is a simple DIY project that can be easily completed in a weekend. We have enlisted the help of landscaping expert Jason Hodges from Adbri Masonry to show us how it’s done.
A fire pit is the perfect addition to any garden during the winter months.
What you will need to build your own fire pit
When it comes to DIY projects, preparation is key. As the saying goes, ‘if you fail to prepare, prepare to fail’, so make sure you have all the tools and materials you need before you start to build. Otherwise, you might end up having to take unwanted breaks to go to the hardware store mid-project.
Before getting the materials, make sure you have contacted your local council to determine any building codes and regulations that might dictate where you can build your fire pit. A general rule of thumb is to ensure the location chosen is far from the house and any shrubbery or overhanging trees. It’s also a good idea to check the property plans for any underground cabling or pipes, particularly if you’re digging your fire pit in.
Once the rules and regulations are met, it’s safe to start. Here’s what you will need to complete your DIY fire pit:
Materials
- Garden wall blocks
- Capstone blocks
- Road base
- Sand and cement mix
- Landscape grade adhesive (like liquid nails)
Optional:
- Steel fire ring or fire bowl
- Decorative pebbles
- Note: Make sure you use garden wall blocks and capstones that are more narrow along one edge. This will allow you to easily create a circle, with the narrow side facing inwards. Jason also advises, “use blocks that are “interconnecting” and don’t need mortar or glue. This makes stacking them together easy and means you will smell the fire, not the fumes from the glue”.
Tools
- Mallet
- Shovel
- Leveller
- Measuring tape
Steps for building your own fire pit
Once you have all of the necessary tools and materials, you’re ready to build your own fire pit. Here are Jason’s steps for building a beautiful fire pit in your garden:
Step 1: Dig out a circular trench
Prior to digging, you’ll need to measure out the diameter of the site that you wish to build the fire pit on. This will ensure you use the correct number of blocks to create a perfect circle.
Once you’ve ensured the site is the right size, use the shovel to dig a shallow circular trench. Jason adds, “lay your blocks out on top of the grass and go around the circle and mark out with your shovel. Then, simply dig out the soil and grass in this shape.”
Measuring out the site prior to digging the trench will ensure no mishaps and unwanted trips to the hardware store.
Step 2: Fill the trench
Fill the trench that you have just dug out with about 100mm of road base. Then fill it with sand and cement mix, with a ratio of about 6:1 (six parts sand, one part cement). “Level out the mix and then start laying your blocks. Make sure you check the level from block to block.” Lay the blocks on top of the cement mix circle — this is what secures them to the ground.
Checking the level of the blocks as you build the fire pit will ensure that it remains level and the finished product is structurally sound.
Step 3: Stack the next row
Once you have finished the first row and have created a level circle, you can build the ring upward with more bricks. Make sure you layer them in between the lower level of bricks. This is where using interlocking blocks comes in handy: They’re super easy to stack, and they don’t require any additional materials.
Continue to stack the bricks until you have around two layers of interlocking blocks.
Stack the bricks carefully to ensure you create an even and level fire pit.
Step 4: Seal the top with capstones
Lay a single row of capstones on top of the blocks. Then, lift each capstone up and use a few spots of landscape grade adhesive to seal them on top of the blocks.
Using capstones will seal off the design to make it look professional and polished.
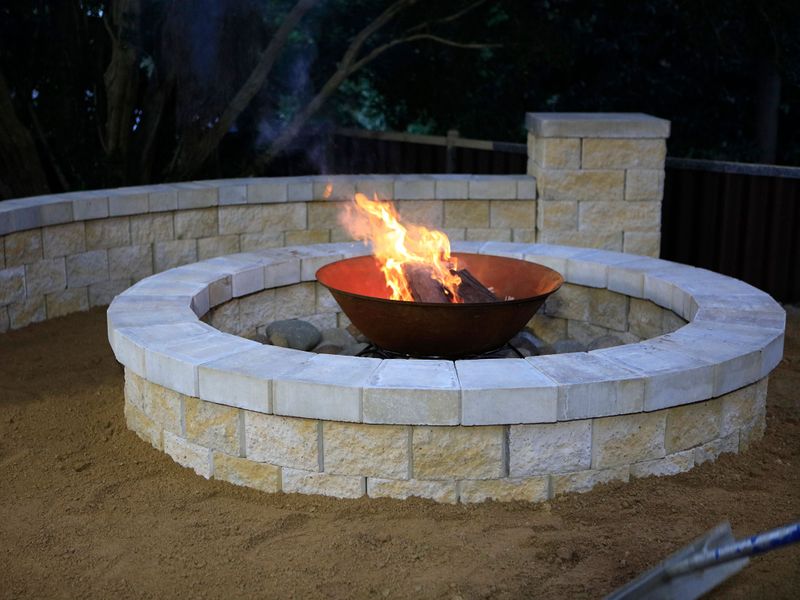
Step 5: Fill the pit with pebbles and a fire ring
To make the fire pit look finished and to disguise burnt grass underneath, layer the bottom with decorative pebbles. This will create a beautiful finish for your fire pit.
While you can still light a fire in this space without an additional steel bowl or fire ring, you will need to make sure the pit is big enough for the flame to be at least 500mm from the bricks. This will protect the bricks from damage over time, and ensure the fire remains small.
SOURCE: www.realestate.com.au